
In this guide we’ll tell you how to root Samsung via Chainfire’s CF-Auto-Root package using Odin. Chainfire is the one who developed the popular SuperSU root package, roots your device within seconds via single flash from TWRP custom recovery. The root process for most of the devices is same where you need to flash SuperSU zip file via TWRP recovery but in the case of Samsung you need Odin tool. Samsung devices are mostly rooted by CF-Auto-Root package but the package needs to be flashed via Odin because it’s in the tar.md5 extension.
The CF-Auto-Root package is available for different Samsung devices regarding the firmware. You can visit the official Chainfire’s website and download the root package for your device model. CF-Auto-Root package is available for all Samsung devices except the AT&T and Verizon variants that are not allowed by the carrier to unlock their bootloader. Although there are multiple ways to root the device with locked bootloader.
We have mentioned the whole procedure to root your Samsung device with CF-Auto-Root via Odin tool. First you need to download the specified root package for your device regarding model and firmware version and then follow the instructions below to it via Odin tool. Be careful and choose the correct CF-Auto root package for your device to avoid issue during flashing process.
How to root Samsung via CF-Auto-Root using Odin
Pre-requisites:
You should have working USB drivers for your device installed on PC. If not, follow this guide to download
The CF-Auto-Root.tar file, should be provided by the referrer post if not visit this link to download it.
Process to root Samsung via CF-Auto-Root using Odin
Extract the above downloaded Odin 3.12.3 zip and in the extracted folder run the Odin3.exe file on PC.
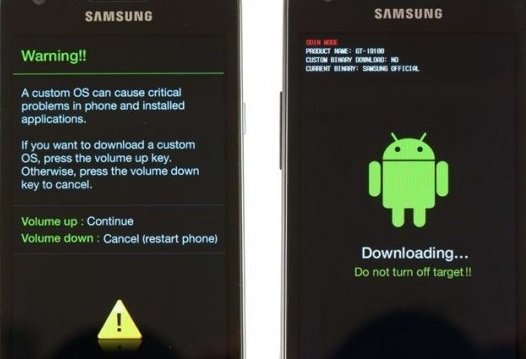
Now turn off your device completely and boot it into ‘Download mode’ or follow this guide to see how to enter Download Mode on your device.

Once you are in the ‘Download mode’, connect your device with PC via USB cable, as soon as you connect your device to PC, the ID:COM window on Odin will turn blue, that means your device is detected by Odin. (as shown above)

Now click the ‘AP tab’ on Odin screen and choose the downloaded CF-Auto-Root.tar file. Ensure that ‘F.Reset Time’ and ‘Auto-Reboot’ options are check and leave the other as it is.
It’s a time to start the installation process, to do so, click the Start button on Odin screen and you’ll see the process will start itself.
Wait for the process to complete. If the process goes smoothly then you’ll see a pass message in the same window where you saw added message earlier.
Your device will now reboot automatically when the process is completed.
That’s it! If you have successfully rooted your Samsung device via CF-Auto-Root using the above Odin process, give us your feedback.