Today we came up with a detailed guide to help you in recording your iPhone screen along audio without using any third party application or even you don’t need to connect it with your Mac or PC as well. Thanks to the latest iOS 11, Apple officially integrated this screen recording feature in their latest development. What really needed is to figure out how to do it appropriately. Well it’s simple and also amazing, because it gives you editing option as well, so save the video that perfectly meets your requirements.
We mentioned each and every step in detail along screenshots of each step to record your iPhone screen without jailbreak or even without the need of a PC or Mac.
How to Record iPhone Screen with audio in iOS 11
Below steps will let you record your iPhone screen with audio on latest iOS 11.
Step 1: Adding Screen Recording Shortcut in Control Center
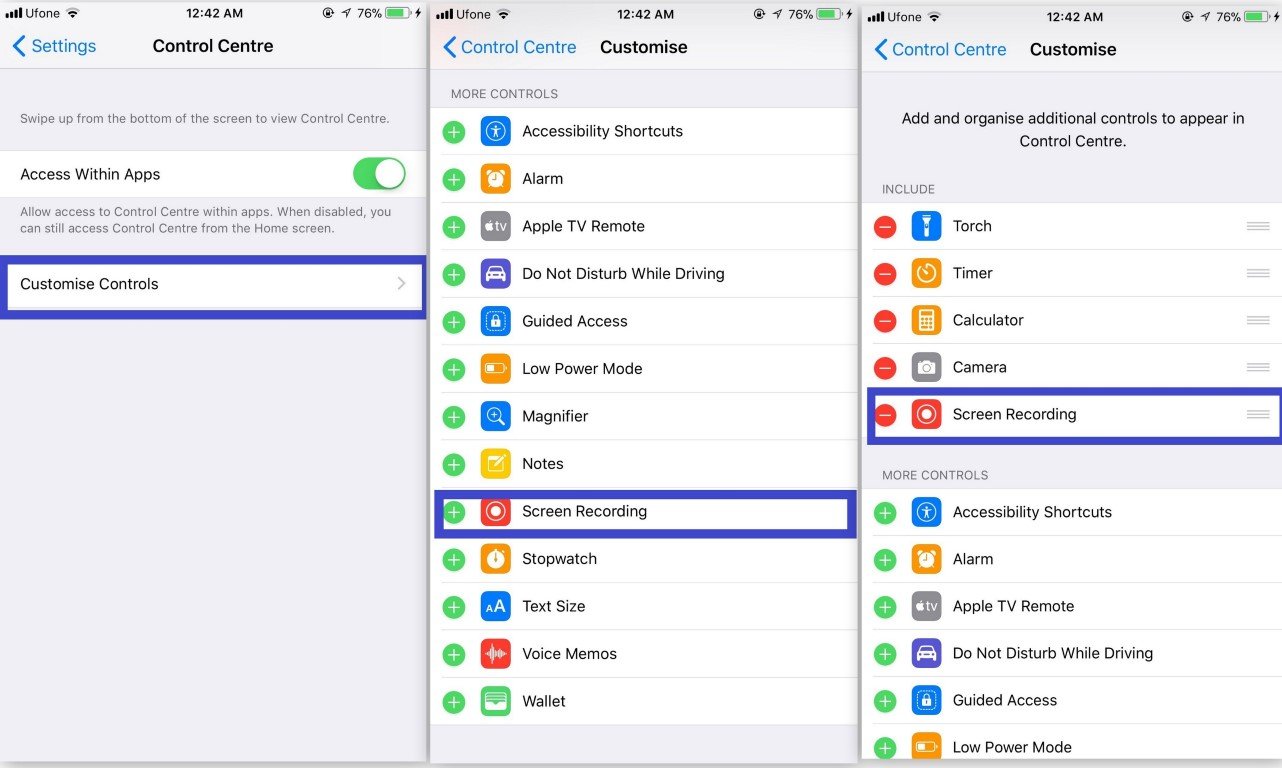
Screen Recording feature in iOS 11 is integrated as an internal feature of the latest iOS, so don’t expect you will get an app icon to sneak into it. First make a shortcut of Screen Recording feature in control centre.
How to make Screen Recording shortcut in Control Centre
Tap on Settings icon on your home screen.
Scroll down to Control Centre
Tap on Customise Controls
Scroll down and find Screen Recording
Tap on the Green Plus “+” sign to add Screen Recording shortcut in control center.

Step 2: Record your Screen with Screen Recording
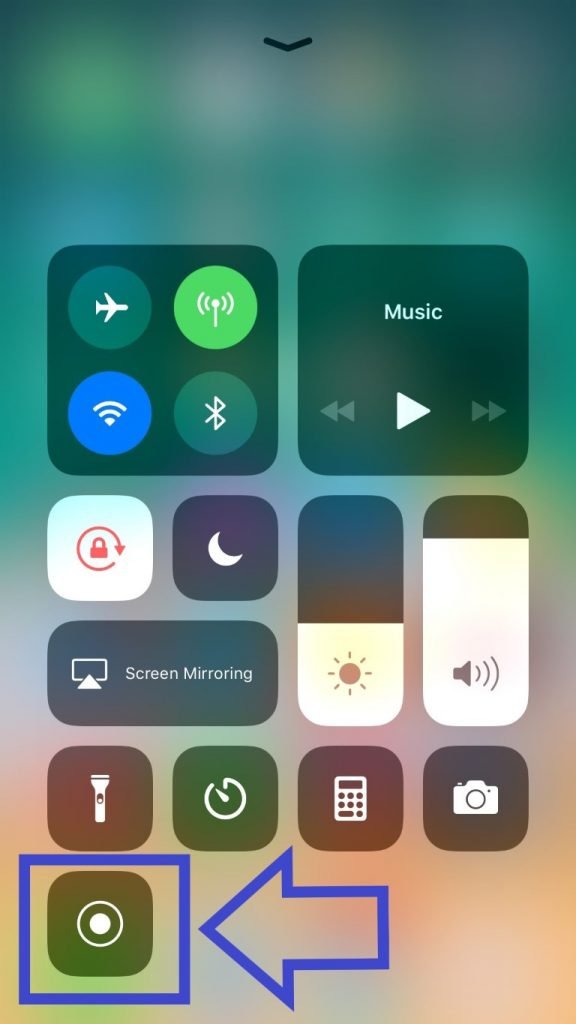
With a shortcut of Screen Recording in your control centre you are all set up to record your iPhone’s screen with just a tap of your finger.
Pull up the control center shortcuts and Tap on the screen recording icon, it will start a count down from 3 to 1 soon after you press it. Indeed it is a great future, as it gives you space for less editing by not putting up the process of initial start of recording in your recorded video. Now you can record your iPhone screen as long as you want along the audio of all the running apps.

How to add Microphone Audio during Screen Recording
If you want to turn on mic input in your recordings, then again you have to go to the Screen Recording shortcut and hard press it to unveil the Mic on/off option.
Tap on the Mic icon to enable Microphone Audio (Mic icon will turn red).
You are all set to record your iPhone Screen along Microphone Audio.

How you will know your screen is getting recorded
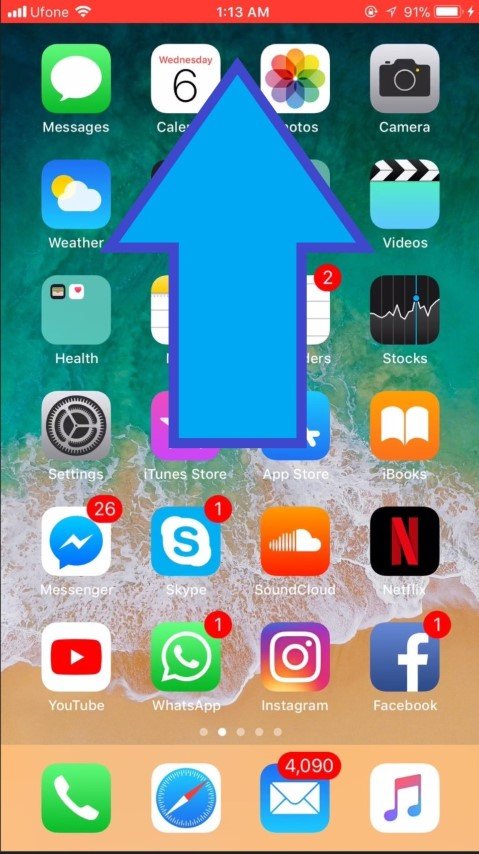
When you enable screen recording, after the initial count down, it will show a red bar at the top of your iPhone’s screen. It will stay like this unless you open some app or game that is set up to open in full screen mode, still it will keep on recording your screen but without any visible sign, otherwise that red bar will be active all the time during screen recording.

Step 3: Stopping Screen Recording on your iPhone
Well it’s pretty simple, just tap on the red bar above and it will came up with a popped out message of Stop Screen Recording. Tap on Stop button to Stop Screen Recording on iPhone.
Another option of stopping the screen recording is by tapping on the Screen Recording button in your Control Centre and it will came up with the same option of Stop Screen Recording, again tap on Stop button to stop screen recording.

Step 4: Find your Recorded Video after recorded by Screen Recording
iPhone Screen Recording saves the recorded video in your iPhone’s gallery and soon after you press the stop screen recording option, it pops out with a message of “Screen Recording video saved to Photos” as shown in below picture. Here you will be able to take the first glimpse of what you have recorded on your iPhone.

What is the format and resolution of video made by Screen Recording?
Screen Recording makes a full HD video and saves it into a MP4 Video File. You can save the video on your Mac or PC by simply connecting your iPhone with your computer and grab it by going into to accessible gallery folder.
Also Read: How to get Google Assistant on iPhone or iPad
Step 5: Further Editing to the Recorded Video by Screen Recording
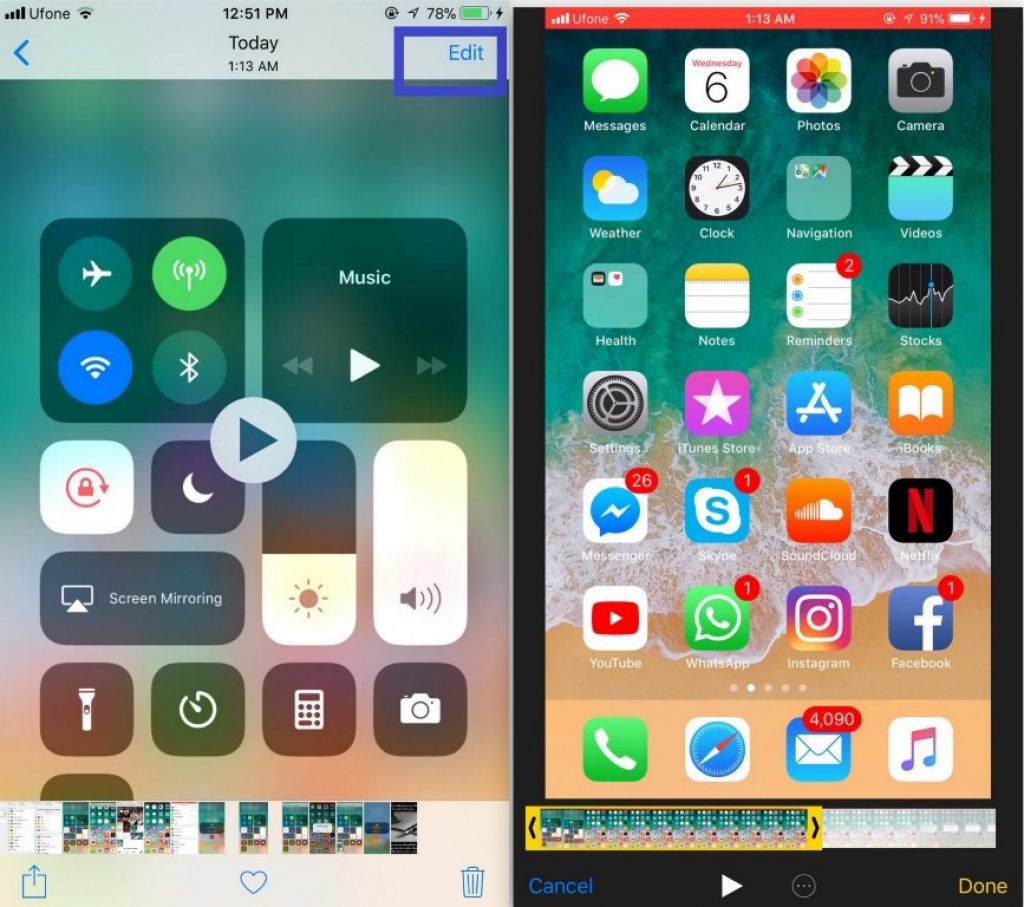
It is fact that most of the screen recording methods needs intense editing as recording a screen with in the same device also records the initial start and stop of recording method, that I guess no one needs. So good thing about iPhone’s Screen Recording feature is that, it gives you a few seconds in the beginning that helps you in setting up the recording from where you want to start exactly. Well it saves the initial editing time but still when push the stop button it will pop out with options, that will also get recorded. So follow the most easy and simple way of editing the video is by simply tapping on the edit option above the recorded video in iPhone.

After getting into the edit video option, just select the starting and ending chunk that you want to keep as your iPhone screen recording. Save the edited clip as “Save as New Clip” and it will save the exact thing that you wanted to record.
There are many other editing tools available in App Store and also you have the option to edit the video by saving it on your computer for further rich editing via third party softwares.
Also Read: How to make backup of iPhone, iPad and iPod Touch [Quick Guide]
Final Words about Screen Recording in iPhone
Screen Recording feature in iOS 11 is the best screen recording method ever introduced in any iDevice. It is the most convenient, easy and clean method of recording your iPhone screen without any need of third party software or even connecting your device with a computer.
For any query feel free to contact us by leaving your message below in the comment section and also share your experience with us and follow Droidvendor on Twitter, Google+ and Tumblr too for staying updated on any feature news, guides etc.
