Welcome to Droidvendor.com! Here we’ll discuss the step by step process to install stock firmware using Odin tool on a Samsung Galaxy device. Odin tool is not limited to flash the stock firmware only but it allows you install the custom ROMs as well. Yes, Odin tools supports all the firmware/flashable files with .tar or .tar.md5 format so if you have a custom firmware as .tar file then it can be flashed on a Samsung device via Odin.
Odin is a very useful third party tool, designed specially for Samsung devices to perform multiple operations including, installing TWRP recovery, root, flashing kernels, bootloaders and more. In fact the Odin tool is the most necessary channel and a life savor for a bricked Samsung device. Grab the latest Odin version from the link below and put your device, Download Mode and now you are free to do whatever you want to do with your device.
The process to flash stock firmware on Samsung Galaxy devices is almost same, because you need to perform same procedure along same tools but different firmware file. The Odin 3.12.3 is design for the latest flagship devices by Samsung, including Note 7, Note 5, S7 and S6 but you can also use older devices on it as well. Just follow the detailed instructions to update stock firmware using Odin on Samsung Galaxy devices.
How to install stock firmware using Odin on a Samsung device
Disclaimer: The guide includes process to flash stock firmware on a Samsung device, the writer is not responsible for any damage if you perform something on your own apart from the below mentioned instructions.
Pre-requisites:
You should have working USB drivers for your device installed on PC. If not, follow this guide to download
The firmware .tar file, should be provided by your previous referrer post.
Process to flash Samsung firmware via Odin
Extract the above downloaded Odin 3.12.3 zip and in the extracted folder run the Odin3.exe file on PC.
Now turn Off your device completely and press and hold “Volume down+ Home + Power” keys simultaneously for a few seconds until you see a screen with warning.

Press Vol Up on the warning screen to continue and boot it to Download mode or follow this guide to see how to enter Download Mode on your device.

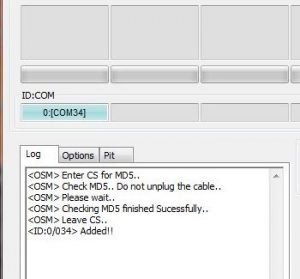
Keeping your device in Download mode now connect it with your PC using USB cable, as soon as you connect your device to PC, the ID:COM window on Odin will turn blue, that means your device is detected by Odin. (as shown above)

Now click the AP tab in Odin and choose the downloaded firmware .tar file. Ensure that ‘F.Reset Time’ and ‘Auto-Reboot’ options are check and leave the other as it is.
It’s a time to start the installation process, to do so, click the Start button on Odin screen and you’ll see the process will start itself.
Wait for the process to complete.
If the process goes smoothly then you’ll see a pass message in the same window where you saw added message earlier.
Your device will now reboot automatically when the process is completed.
That’s all! Stay tuned for more updates and give us your feedback.
